


When I was deciding what type of mom I wanted to be, one thing I knew was that I wanted to be a creative DIY mom. I wanted to have a sense of accomplishment from making things that my child could use and appreciate. In my short time as a “DIY Mom” thus far, I have learned four main lessons from my projects that also translate to parenting itself.
These lessons include:
- Do your research– Research milestones before they happen, so you are prepared. Also, make sure to research products you are using for your children and what they are made of or what is in them.
- When something is not going right, there is no shame in giving up and taking a shortcut. You can always come back to the original plan later and try again. We have definitely used this principle when it comes to sleeping and introducing solids.
- Make sure you have a good support system to lean on in times of need. Whether it’s a significant other, parent, an in-law, family member, or friend, try to find support people that can help you; even if it’s just to get you out of the house for a walk or to get a drink to have a break from the chaos of parenting. Having someone to swoop in to help save the day is crucial.
- What you see on TV and the internet is not always real life. Those pictures, meals, and projects may not have happened in one shot, they may have taken numerous tries. No one wants to show how things went badly. Those moms on Instagram that look like they have perfect lives in pictures sometimes spend hours prepping and retaking that one picture. Don’t try to keep up, just do you.
After eight months of being parents and my fourth baby DIY project, I felt like my husband and I had finally found our way on both fronts. And that way has been exactly that; OUR WAY.
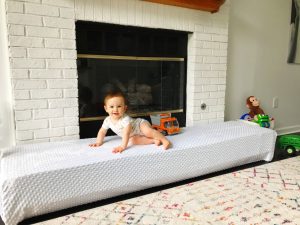
When my son started to become mobile, we determined that we needed something to safely cover our fireplace hearth. I asked fellow moms what they did, and I researched options to purchase versus DIY options. In the end, we took all of that DIY information and made something that wasn’t exactly like the other options but more suited to what we felt would work for us.
Did it turn out picture-perfect? No, we ended up slightly short on supplies, the green foam shows through in certain light, and the fabric color doesn’t match the fireplace like we wanted it to since we had to order everything online. However, it looks good, it’s comfortable to sit or lay on, my son likes it, it keeps him safe, and we are proud of it. In my book, that’s a smashing success.
If you’d like to make your own, here’s what we did, feel free to adjust as needed.
Supplies
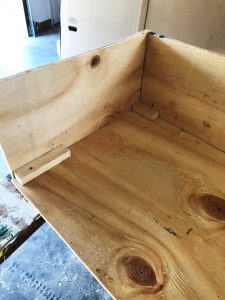
¼ inch thick plywood
5- 1 inch x 1 inch wood blocks 2-3 inches in length (or any scrap wood blocks you have of similar size)
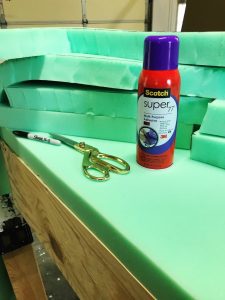
2-inch thick upholstery foam
Fabric to cover
Spray adhesive
Nails
Nail gun or hammer
10-½ inch screws
Screwdriver
Staple gun
Saw
Sharpie marker for drawing out your measurements
Extra sharp scissors for cutting the foam
Instructions
Measure the top of your hearth’s length and width (add an extra 1/2 inch or so of wiggle room to the length so the whole thing will fit over the hearth without being too tight). Cut your first piece of plywood to these measurements for the top.
Then measure the height of your hearth (If you have hardwood floors stop your measurement ½ inch from the floor to protect the seat from scraping the floor) and use the same number for length as the top and cut your second piece to these measurements for the front.
Take the height and width measurements that you used and make your two end squares from those measurements.
Once you have all of your pieces cut out, use a nail gun or hammer and nails to attach the front and two side squares to the top section to make a four-sided box that will sit on top of your hearth.
Since the plywood is thin, we decided to reinforce the nails by screwing two screws each into the five wood blocks and the inside of the box and equally spacing three of them across the front and one on each end.
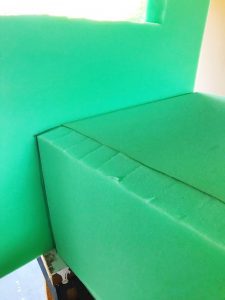
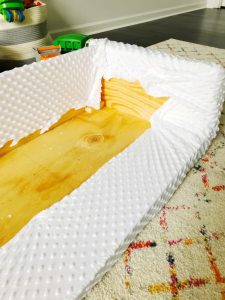
 Next, use the box to trace out your foam pieces using the measurements from the plywood. Cut the top piece first and lay it on top of the box, then trace your front piece out so that it meets the top of the top piece. Once that piece is cut out, place it on the front, and then trace your side pieces to meet the front and top pieces. We could only get the foam in certain increments since we ordered it online during quarantine, so we made the front piece slightly shorter in height so that we didn’t have to order double the amount of foam just to cover a two-inch-wide strip. If you need to do the same, the bottom front is the place to do it.
Spray one side of your foam and the box with the spray adhesive and stick your foam pieces to the box. Let the pieces sit according to the adhesive directions before applying the fabric.
Lay your fabric out with the front side facing down and lay your box down in its center. Starting with the long edges, take your fabric and pull it over the foam and into the inside of the box, pulling it tight enough so that it doesn’t sag, but not so tight that it presses your foam down. Use the staple gun to attach the fabric to the plywood.
Once you have the long edges done, fold the sides up so that it forms a nice crease on the front and then fold down and around the bottom and back edges of the foam. Experiment with different ways to fold the fabric to get the cleanest looking crease in front. Then staple your fabric down just as you did the long edges.
Lastly, cut off any access fabric and place the finished product over your hearth.


