


This week is National Gluten-Free Baking Week!
Have you ever wondered how exactly a liquid cake batter transforms into a fluffy, light, and delicious cake? We could simply call it magic or praise the excellency of the baker (which, by the way, should always be done!), but, in fact, it is the result of a chemical change. In this chemistry of baking, several elements take place, and gluten is one of them.
Gluten is a protein found naturally in wheat, and it is what generally gives elasticity and consistency in bread and cake recipes. However, this natural and almost magical element can also work as a villain. For some people, gluten is not well accepted by their intestines and can cause discomfort (gluten intolerance), but it can also mean a serious disease for others (Celiac disease is an autoimmune disorder where eating gluten causes damage to the small intestine).
Following a gluten-free diet can feel overwhelming, and replicating the “gluten effect” can be challenging, but fortunately, some good combinations of flours have been studied, and it is now possible to enjoy every bite of a cake without the discomfort and with all the yumminess!
Some examples of gluten-free flours:
- Buckwheat flour
- Coconut flour
- Gluten-free oat flour
- Almond flour
- Arrowroot
- Rice flour
- Tapioca flour
- Store-bought gluten-free flour blends
Since each flour can yield different results, to get the “gluten effect,” it is recommended to combine different flours or adjust your favorite recipes by substituting regular flour for an all-in-one gluten-free flour blend (store-bought). In case you want to try a homemade blend, here is my favorite combination:
Homemade Gluten-free Flour Blend:
1 cup almond flour
½ cup brown rice flour
¼ cup gluten-free oat flour
¼ cup arrowroot
Tips for success
- Gluten-free cakes can be a little dry, as gluten-free flours absorb more moisture than others, so always add some fat to your recipe.
- Raising agents (baking soda or baking powder) are essential, and you may increase them by about 25 percent compared to a recipe containing gluten.
- After baking, if sugar is not a problem, some sugar syrup can be added between layers, as well as frosting (buttercream/ganache/etc.) to seal the moisture in.
- Always store gluten-free cakes in airtight containers outside of the fridge to avoid quick dry.
And now that you know that a “cakey” gluten-free diet is possible, let’s get baking.
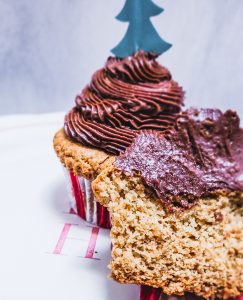
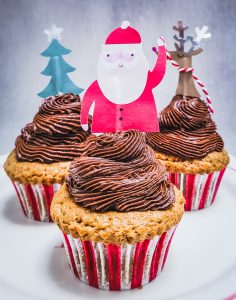
Gluten-free Chocolate Chip Cupcakes (Vegan)
Yield: 12 cupcakes
Ingredients:
2½ cups gluten-free flour
1 cup sugar of preference (I use brown sugar)
1 tbs baking powder
2 tsp baking soda
½ cup vegetable oil of preference (I use coconut oil)
1 cup vegan buttermilk
1/3 cup applesauce
1 tbs vanilla extract
1 cup chocolate chips
Frosting
1 cup vegan butter (room temperature)
3 cups powdered sugar
1 cup cacao powder
Directions:
- Prepare the frosting: In a bowl, with a hand or stand mixer, beat the butter until whipped. Add sugar and cacao and beat on high speed until creamy and fluffy. Put aside (or store in the fridge if not using immediately).
- Preheat the oven to 350F.
- In a bowl, mix dry ingredients (flour, sugar, baking powder, baking soda) except chocolate chips.
- In another bowl, mix the wet ingredients.
- Pour the wet mixture into the dry mixture and combine well.
- Fold in the chocolate chips.
- Fill 12 cupcake liners with the batter until three-quarters full.
- Bake for 30 minutes, or until a toothpick comes out clean after being inserted in the middle of a cupcake.
- Remove from oven and let cool.
- Using a piping bag, pipe the chocolate frosting onto each cupcake.
Enjoy!


